How to Distribute Your Product
Products created using EZMenu can be distributed.
Product Distribution Steps
-
Configure the Menu and Generate the Script
Configure the menu in EZMenu and generate the script (this is a basic step, which you should have already completed). -
Obtain the Signature Information
When using the[EZMenu]Setupscript, the script will output a piece of signature information in the public screen. (If the menu is working smoothly, this step should already be completed, just find the signature in the public screen). Each time the script is changed, new signature information will be generated, and each generated signature is valid. There is no need to worry about the signature being different each time, just make sure you have copied the correct signature information.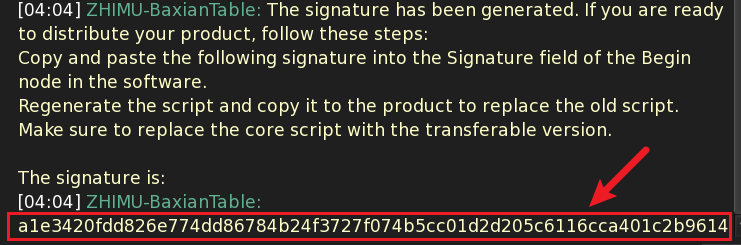
-
Fill in the Signature Information
Copy the signature information obtained in the second step and paste it into theSignatureinput box in the Begin node property panel of EZMenu. -
Regenerate the Script
After filling in the signature information, regenerate the script. -
Replace the Old Script
Replace the script generated in the first step with the newly generated script. -
Replace the Core Script
Replace the[EZMenu]Setupscript with the[EZMenu]Masterscript.
At this point, your product can be transferred and distributed.
Watch the video demonstration: Video Demo - Creating a Non-PBR Material Switch Menu or Video Demo - Creating a PBR Material Switch Menu.